Personal Website
Learn more about HTML →
Learn more about CSS →
To get started with HTML, CSS, and designing for the web, we'll create a personal landing page to learn about the basics of scripting. It is likely that you will not code your portfolio entirely by hand, but learning the basics will be helpful when you dive into a CMS such as Cargo, or work with developers in the future.
To host our personal landing pages we'll use Github pages, a free service from Github that helps simplify moving code online, and makes it accessible via the world wide web. Github is a version control system that stores and manages a "repository" of code that can be downloaded, edited, and reuploaded to Github. This enables collaboration and code backups (which are helpful in case something gets lost or a bug gets introduced).
Tools: Personal Site Starter Kit, Sublime Text, Github (Mac) or Github (Windows), Google Chrome Browser (helpful because of its dev tools)
The web began as a network for educators to communicate between UCLA and Stanford Research Institute. Proposing a network of computers that communicate with eachother, they were at first very crude and could send simple text messages
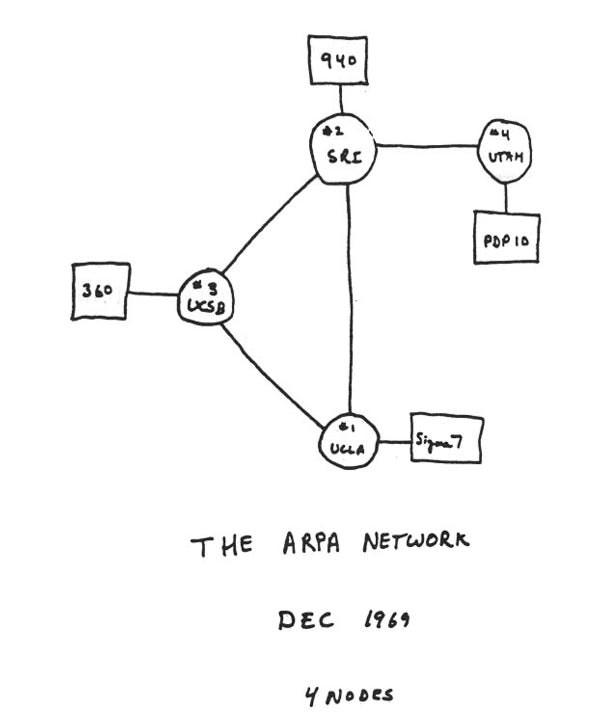
Over time the web grew into a series of protocols, and standardized scripting languages for display.
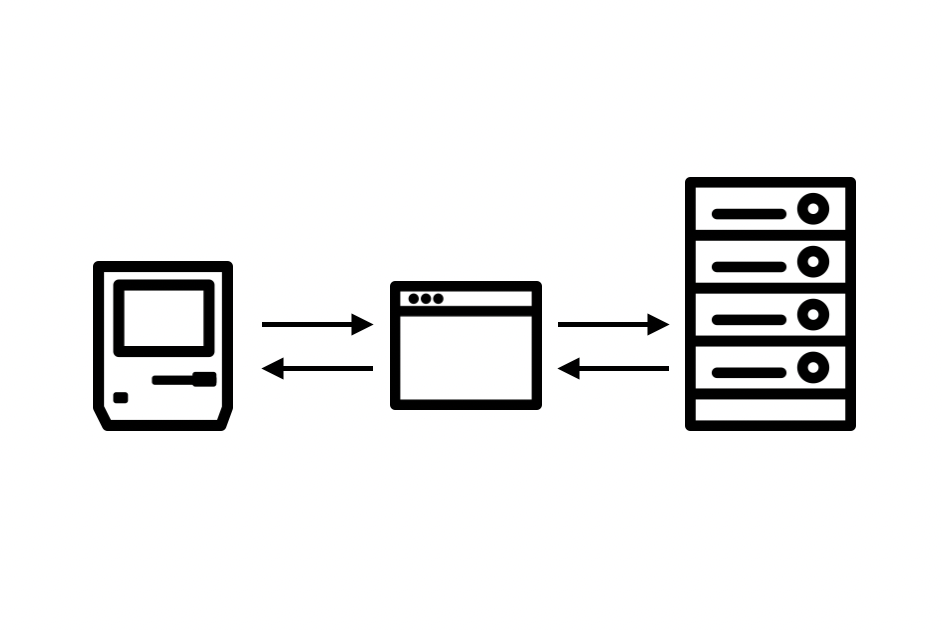
When your web browser accesses files on the web, at it's most simple, it is simply looking for an `.html` file on a server, and then rendering its code as instructed. For instance, if you open the same `.html` file in the browser and a code editor you'll see very different things.
To start making our own webpages, to test our `.html` files before uploading them to a server, we'll instead load them on our own computers.
Software
First, we'll get prepared to create and upload our class site.
- Download these programs onto your computer:
- Sublime Text
- Github (Mac) or Github (Windows)
- Google Chrome Browser
Setting Up Github
Next, we'll set up our Github account and create a repository to host our files online.
See more on Github on Github Guides.
- Go to github.com and create an account (make sure to verify your account).
- Once you are logged in create a new "repository" by clicking the "+" sign at the top right of the page and selecting "New Repository".
- Name your repository “PersonalSite”. This repository will be a testing ground for your code. Set it to "Public", and initialize the repository by checking "Add a README file".
- Click the green "Create repository" button.
Setting Up Github pages
Then initiate Github Pages, github's webhosting feature, for the repository we just created.
- On your "PersonalSite" repository page click on the Settings tab and click on the GitHub Pages section in the right side navigation.
- Under "Source" select the "main" branch and click on the "Save" button.
Linking our computers
Now that our repository and webpage are setup, we will create a link from Github to our personal computers.
- Open the GitHub Desktop application and login with your GitHub credentials
- Go to the File menu and click "clone repository"
- Select the "PersonalSite" repository
- Change the "Local Path" and select a place on your computer where you want the “local” version of your projects to live.
Note: It’s a good idea to have a central folder in which you manage all of your Github Repositories such as your desktop
- Press the “Clone” button.
Creating our first website
Everything is in place to create our first website, we just need to create an index.html file that will act as the "index" of our website.
- Open up Sublime Text and create a new file.
- Download this starter kit.
- Open the "index.html" file and replace the content between the
<title></title>(in the<head>part of the document) with your name. And the content between the<h1></h1>tag with your own info (in the<body>part of your document). - Save the “index.html” and “assets” folder within the "local" folder you specified in the last step. (Do not save the entire template folder. Only pull in the contents of the folder). This will become your personal homepage, so you can do whatever you want here. You can always come back to edit it later.
- Go back to your Github application. You’ll see some empty input fields, one that says “Summary” and the other that says “Description”.
- In the summary, summarize what you just did. You might say something like “initial commit” or “hello world”.
- If you want to say more, type it in description, but this is optional.
- Then press the “Commit to main” button.
- In the top bar of the application, press the "Push Origin” button. Github will ask you to log in if you aren’t already logged in. (Once you press the “Push Origin button, it will change to “Fetch Origin".)
If we've done everything correctly, our webpage should be accessible on the web. Navigate to https://[username].github.io/PersonalSite/ and it’s live! This is your personal landing page for experimentation.
From now on, whenever you want to update your page, first do it to your local version. Your local version is saved on your personal computer. Then, when you want to push it “live” (to the online version), open up your Github application. Make sure that the "main branch is selected from the "Current Branch" dropdown (this is very important!) and press “Commit”. Then press “Sync” in the upper right of the top bar.
Personalizing Your Site
Take some time to experiment with the starter kit template. There are additional files in the assets folder that can be accessed through your webpage. Experiment with removing the comments, which are written beginning with <!-- code and ending with --> code in the index.html file to load images, add paragraph text (inside of the <p> tag), and add a bulleted list. Consider if you were to maintain a personal landing page, what content you may put on it, and add it.
If you want to learn more about how to structure your webpage, move on to the HTML Basics →
Local vs. Online
You will become familiar with having two versions of your site:
Local
This version is located on your personal computer, and therefore only you can view this version. When you open it in a web browser, you will see that the address bar starts with file:// …
Online
This version is located on the internet, and therefore anyone online can view this version. When you open it in a web browser, you will see that the address bar starts with http:// …
When working on a project, you will create things first on your local version. This allows you to properly experiment and test them before “deploying” onto your online version.